Exporting p5 sketches
This chapter present four different approaches for displaying a p5 sketch. Exporting single frames of your sketch, exporting a frame in svg format, exporting a sequence of images and transforming the sequence to video and displaying the sketch on a website.
Exporting frames
You can add the following snippet to your sketch to save the current frame by pressing the letter 'p'.
function keyPressed() {
  // Save frame if letter 'p' is pressed
  if (keyCode === 80) {
    save(`sketch-${frameCount}.png`);
  }
}
If you want to print the frame, keep in mind that you need to have sufficent resolution on the image to print in in a large format. For printing, you need a resolution of 300 DPI (dots per inch). For an A3 size, with 300 DPI resolution, the size in pixels would be 3508 x 4960. You will need to define your canvas in this size, if you would like to print an A3 for example.
Sometimes it might be easier to work with a square canvas, so you might define the size as for example createCanvas(4000,4000), save your frames and arrange the frames for example in Photoshop for the paper size you are aiming for.
Exporting an animation as GIF
function setup() {
  createCanvas(400, 400);
}

function draw() {
  background(220);
}

function keyPressed() {
  // this will download the first 5 seconds of the animation
  if (key === 's') {
    saveGif('mySketch', 5);
  }
}
Exporting frames as SVG
It is also possible to export frames in an SVG format. This might be handy as the vector format can be scaled to higher resolutions and could be used with laser cutters, CNC-machines and pen plotters. However, an external library called p5.js-svg is needed which does not support all the features of the p5 library. Remember that it is an experimental add-on for p5 so there might be occasional bugs or missing feautres.
To use p5.js-svg, add a link to the library to the <head> tag of your index.html file. You can find the file in the p5 online editor by opening the drawer on the left hand side of the screen. Add the following line after the two other <script> tags:
<script src="https://unpkg.com/p5.js-svg@1.3.3"></script>
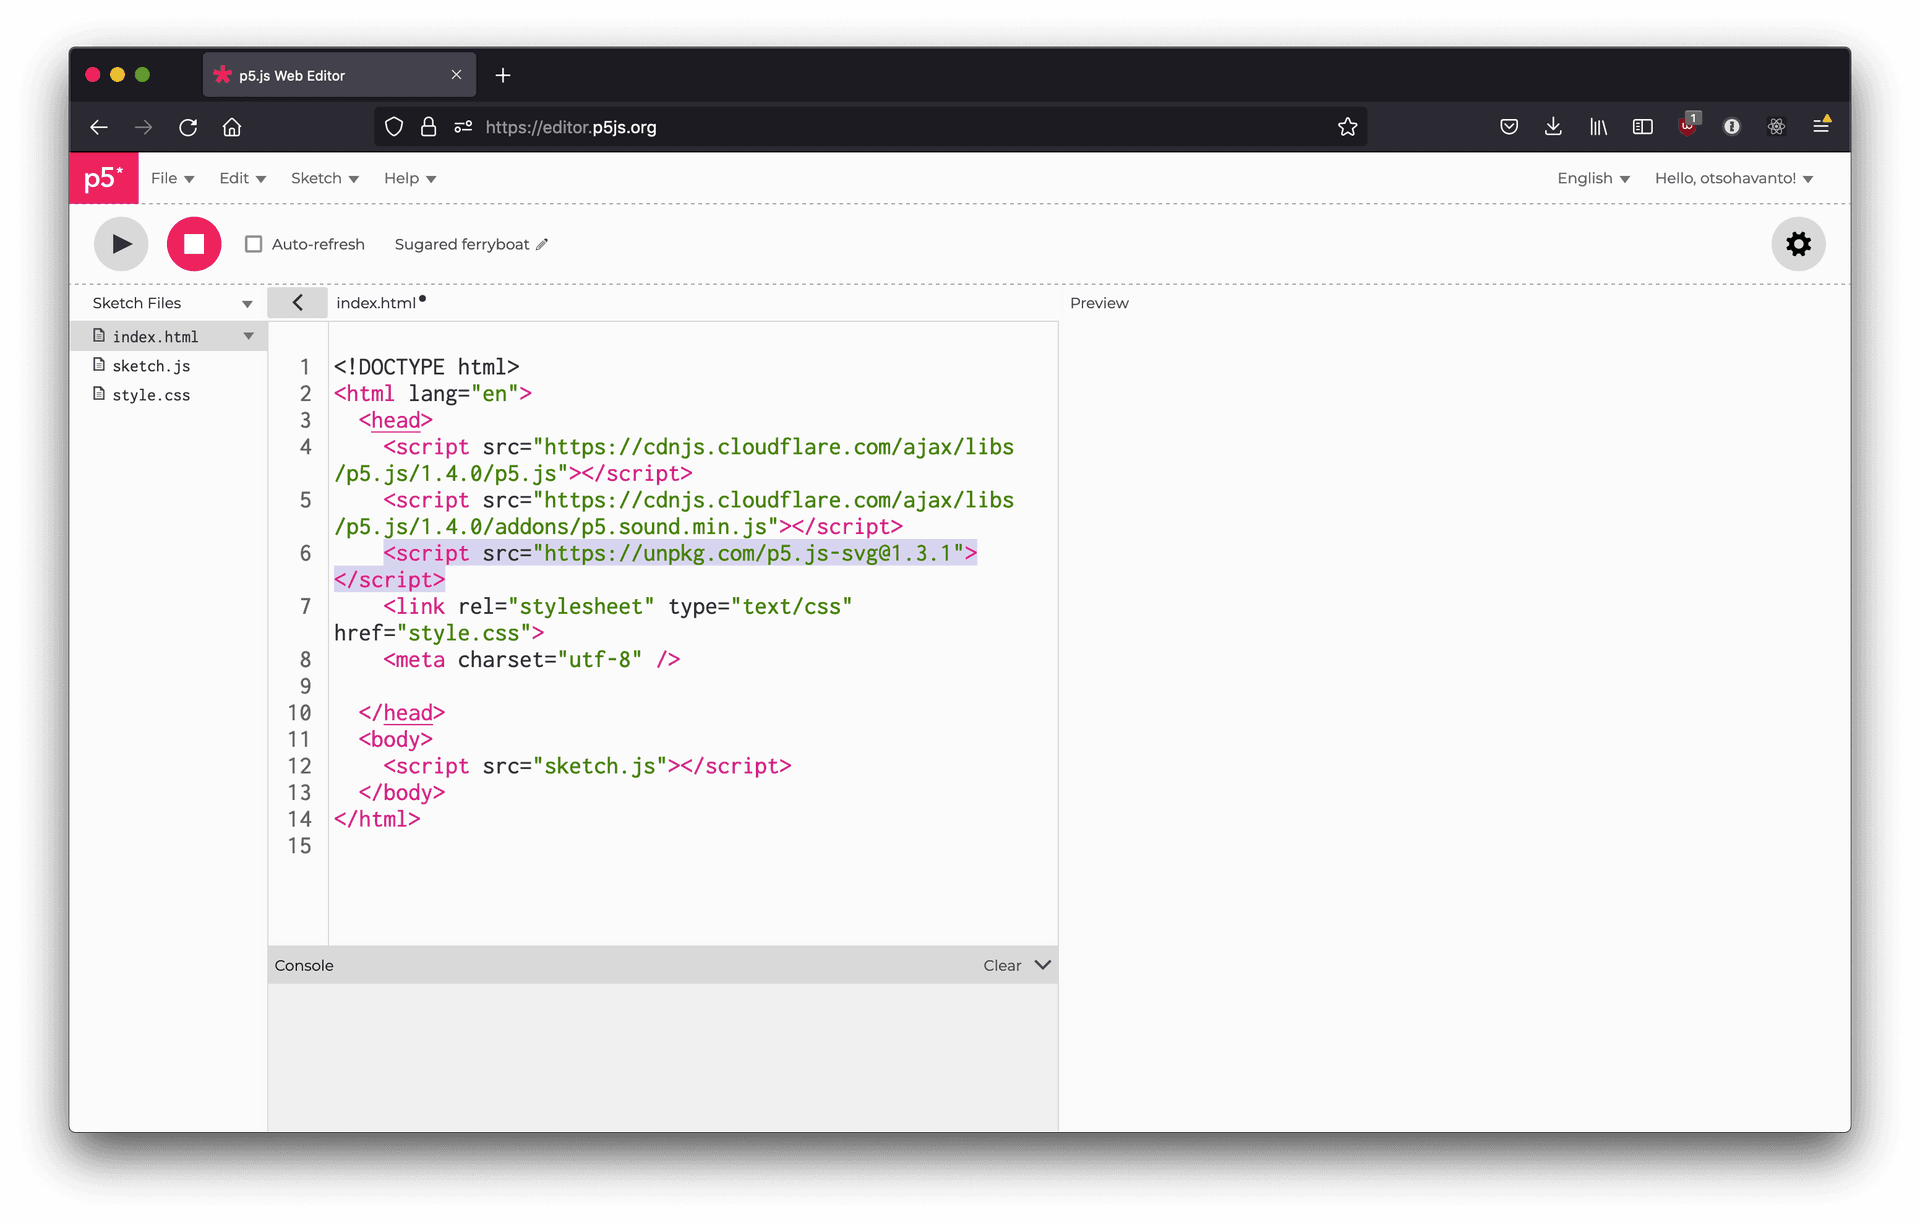
Link to p5.js-svg added to index.html on line 6
To use the SVG renderer, add the constant SVG to you crateCanvas function call. For example:
function setup() {
  createCanvas(400, 400, SVG);
}
Now you can call save()and save the current frame as an SVG file. You can for example add a keyPressed function that runs when any key on the keyboard is pressed:
function keyPressed() {
  save();
}
Or you could call save() inside draw function after a certain number of frames is passed:
if (frameCount > 100) {
  save();
}
You can learn more about the library on the github page at https://github.com/zenozeng/p5.js-svg.
A video of a p5 sketch
The absolutely easiest way to record a video of your p5 sketch is to use a screen recorder and record your screen as you run the sketch. If you want to have a better quality recording, you can use a library called CCapture.js.
To use the library, add a link to the <head> tag of your index.html file. You can find the file in the p5 online editor by opening the drawer on the left hand side of the screen. Add the following line after the two other <script> tags:
<script src="https://unpkg.com/ccapture.js@1.1.0/build/CCapture.all.min.js"></script>
Here is an example sketch using CCapture. You can find a working example also here: https://editor.p5js.org/otsohavanto/sketches/S6il9oLfC.
let fps = 30;
let capturer = new CCapture({ format: 'png', framerate: fps });

function setup() {
  createCanvas(400, 400);
  frameRate(fps); //set frameRate to match the CCapturer instance
}

function draw() {
  if (frameCount === 1) {
    // Start capturer on the first frame
    capturer.start();
  }

  // Write your sketch
  background(220);
  let x = noise(frameCount * 0.01) * width;
  let y = height / 2;
  circle(x, y, 100);

  // Save the current frame with CCapture
  capturer.capture(document.getElementById('defaultCanvas0'));

  // Stop and save the capture after a certain frame
  if (frameCount > 300) {
    capturer.stop();
    capturer.save();
    noLoop();
  }
}
The end result will be a zip file with all the saved frames. To convert the frames to a video, you could use for example FFmpeg with the following command. Note that the resolution (1920x1080 below) and frame rate (30 below) should match your sketch.
cd /path/to/the/directory/containing/images
ffmpeg -r 30 -f image2 -s 1920x1080 -i "%07d.png" -vcodec libx264 -crf 17 -pix_fmt yuv420p output.mp4
If you are not familiar with command line tools or can not install ffmpeg, you can use for examle Adobe Premiere for converting image sequence into video. Here is a short tutorial for doing that: https://www.youtube.com/watch?v=LJFsndPKvFQ
p5 sketch on a website
Just as editor.p5js.org is displaying your sketch, you can run the sketch on your own website. The following resources will get you started:
- p5.js 'Getting started' instructions for running a p5 sketch locally on a website: https://p5js.org/get-started/
- Daniel Shiffman: p5js sketch as a website background: https://www.youtube.com/watch?v=OIfEHD3KqCg
- Daniel Shiffman: Hosting a p5.js sketch with GitHub Pages https://www.youtube.com/watch?v=ZneWjyn18e8